By Caelyn Hammet, Horticulture Student and Campus Grown Foods Horticulture Intern
Growing your own food at home is a great way to learn a new skill, become self-sufficient, improve the quality of your diet, and reduce your impact on the environment. However, without outdoor space like a garden or balcony, it can be difficult to cultivate some fruits and veggies. In this article, you will learn how to put together your own small hydroponic systems that work perfectly for growing herbs, leafy greens, and other veggies indoors. The two systems outlined are modeled off hydroponic systems used in commercial production settings, like the Campus Grown Foods Partnership hosted in the Horticulture Center. All of the materials listed can be purchased at any local hydroponic supply store or garden center (Bath Garden Center, Fort Collins Nursery, Way to Grow).
5-Gallon Bucket Deep Water Culture (DWC) System: Total Cost = $75
This system is ideal for those who have the space and conditions to grow larger plants like squash, tomatoes, and large houseplants. It will also work well for leafy greens such as kale, collard greens, and swiss chard.
Materials:
- 5-gallon bucket
- Medium air stone
- Air hose
- Air pump
- Recycled Styrofoam or bucket lid
- Net pot or recycled plastic cup
- Complete hydroponic fertilizer
- Propagation media (perlite, vermiculite, or leca)
- Grow light or bulb (if you have no access to a bright window)
- Plant propagation/started seed (no soil)
How to Put it Together:
- Put your 5-gallon bucket in a sunny area of your space, or somewhere you can set up a grow light/bulb above it to ensure your plant receives enough light.
- Connect the air stone to the air pump using the air hose. Place the stone into the bucket and set the air pump aside, close to a power source.
- Following the instructions on your hydroponic fertilizer, add the desired amount to your bucket. This will involve researching what EC (electrical conductivity, or amount of soluble salts, which tells us what the concentration of fertilizer in the solution is) your chosen plant will thrive in. For most leafy greens, this value will fall between 1.5-2.5 mS. All you need to do after you find out your target EC is look at how much fertilizer per ounce of water you will need to add to your bucket.
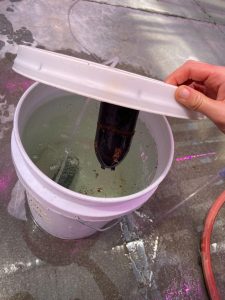
- Next, add the amount of water that you used in your calculation from the previous step to your bucket. You want the solution to reach the button of your net pot or cup once you place the lid on so that the plant can take up the water and nutrients it needs.
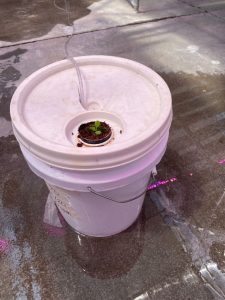
- After the bucket is full, cut out a piece of recycled styrofoam to float on top, or just use a lid that fits on your bucket. Trace your net pot or plastic cup and cut out a hole in the middle of your top piece so that the cup fits inside without falling into the bucket. You may also want to cut a small space for the air hose to go through. If using a plastic cup, take this time to also cut some holes or slits into the bottom and sides of the cup so the nutrient solution can get to the plant.
- Fill your cup or net pot with your chosen media (perlite, leca, or vermiculite), and make sure that at least the bottom of the substrate is wet. Place your plant inside, ensuring that it is not too deep or shallow. You want it to reach the wet part of the media while also being level with the top piece of the bucket.
- Plug in your air pump and grow light if you have one, and watch your plant grow! Make sure to check your water level daily and top off with more water and fertilizer as needed.
Hydroponic Microgreen Tray: Total Cost = $45
This system is perfect for those who have less space and want to grow food without spending an arm and a leg. You can use this tray to grow microgreens of all kinds, bean sprouts, and even baby salad greens.
Materials:
- Black plastic planting tray with a solid bottom (usually sized 11”x22”)
- Black plastic planting tray with holes in the bottom, same size as solid tray
- Clear plastic dome, same size as trays (usually 7” tall)
- Planting media, coco coir works best
- Hydroponic fertilizer
- Grow light or bulb (if you have no access to a bright window)
- Seeds of your choice
How to Put it Together:
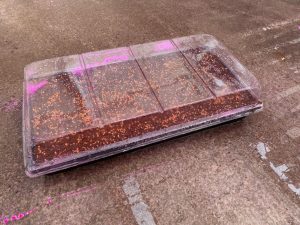
- Place the tray with drainage holes inside the solid tray
- Fill the inner tray with coco coir and dampen it with water
- Sprinkle your seeds evenly over the coco coir and pour or mist a small amount of water onto them
- Secure your dome to the tray with the ventilation holes open to prevent fungus growth
- This system requires daily watering and feeding with a premixed solution, following the same instructions listed for the 5-Gallon Bucket DWC. To water the system, simply take the inner tray out of the outer one and pour in 1-2cm of nutrient solution, then place the inner tray back in place. You can increase the frequency of watering if you notice that the substrate is completely dry at watering times, or if the plants look dehydrated.
- A grow light is encouraged, but a sunny window will suffice. A seedling heat mat will also encourage faster germination of your microgreens but is completely optional.